SeleniumBasicでは、ブラウザの更新に合わせてウェブドライバーの更新作業が必要になってきます。普段からSeleniumBasicを利用しているとこのウェブドライバーの更新が面倒な作業になります。ChromeDriverの自動更新方法を3つ紹介します。
ChromeDriverを更新する方法として、タスクスケジューラで定期的に更新する方法とSeleniumBasic起動毎にドライバー更新を確認し、更新の必要があれば実行する方法があります。タスクスケジューラによる定期更新は、PowerShellでメインコードを書いている内容紹介とVBAでメインコードを書いているリンクの紹介をします。
タスクスケジューラによる定期更新(PowerShell)
Chromeのバージョンは、1か月に1,2回の頻度で更新されます。タスクスケジューラを利用することにより、1週間に一度程度の頻度で更新実行をする様にジョブスケジュールを組んでおけば、自動的にChromeドライバーが更新され、手動更新の手間が省けます。
ファイル操作はVBAよりPowerShellの方が得意分野ですので、先にPowerShellのスクリプトを紹介します。実行ログも出力する様にしています。
コード実行の流れ
- GoogleChromeのexeファイルディレクトリー設定
- ChromeDriverのexeファイルディレクトリー設定
- GoogleChromeの現バージョン確認
- 現バージョンに合致したchromedriverのZIPファイルダウンロード
- ダウンロードしたZIPファイル解凍
- ChromeDriverのexeファイルディレクトリーへファイルコピー
Chromeブラウザバージョン:115以上の対応
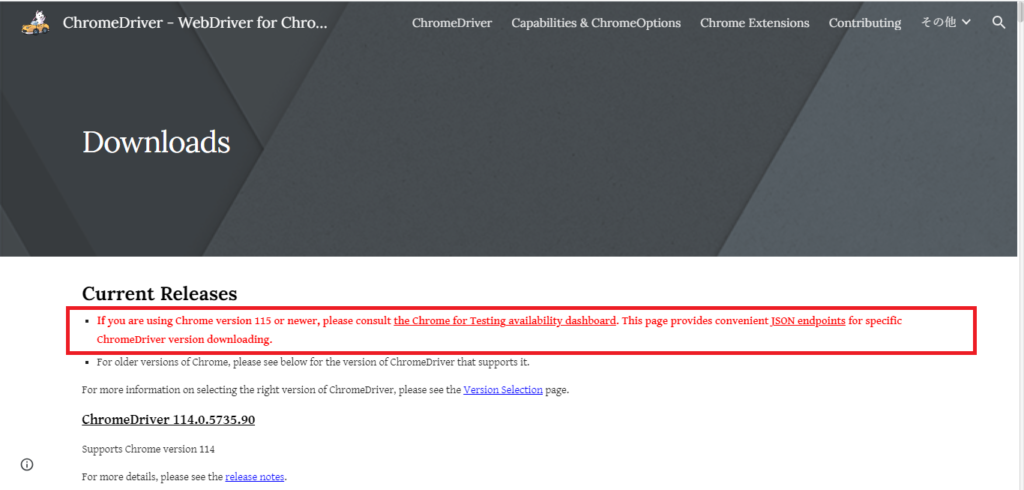
2023年8月現在、ChromeDriverのダウンロードサイトを訪れると、リリース(正規)版のChromeDriverがバージョン114までで止まっています。今現在のChromeDriverダウンロードサイトのトップページは以下の状態です。
なかなか正規版のバージョンアップがされず、そろそろ業務に支障が出てきそうなので、対処方法を考えました。これからChromeブラウザのバージョンが115以上のPCでChromeDriverを取得する方法を紹介します。
Chromeブラウザのバージョンが115以上の場合、正規版のChromeDriverではなく、テスト用のChromeDriverを取得することになります。正規版のリリースまでの場つなぎ的な役割を担うため作成したスクリプトですので、綺麗なコードになっていませんがご了承ください。ファイルもアップロードしておきます。
PowerShellを実行する時は、実行ポリシー設定をあらかじめ変更しておきます。以下、変更手順です。
PowerShell実行ポリシー設定変更手順(ここをクリック)
PowerShellの実行はデフォルトでスクリプトが実行不可能な状態になっています。スクリプトを実行できる様に実行ポリシーの設定をします。
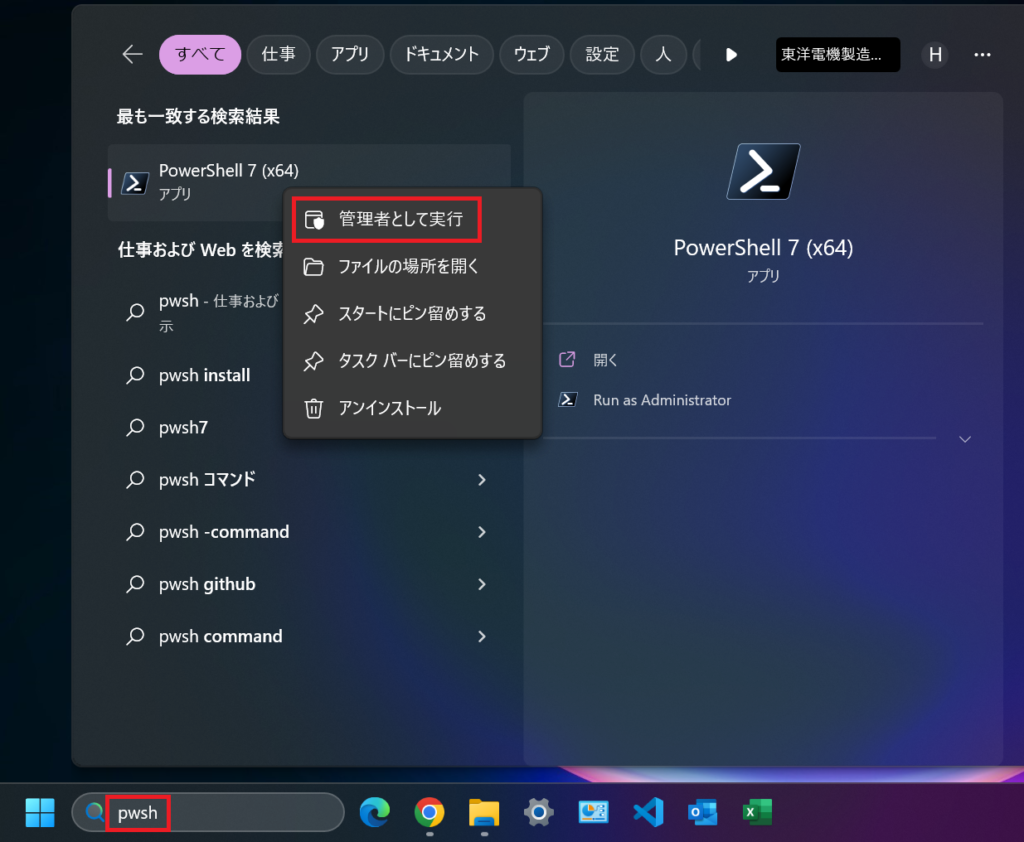
PowerShellを起動する方法はいくつかありますが、今回はデスクトップ検索画面で「pwsh」と入力し、PowerShellを選択します。右クリックで管理者として実行を選択します。
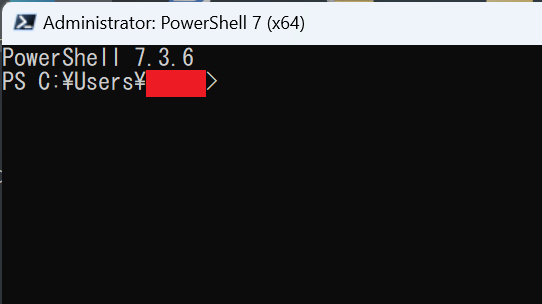
PowerShellのターミナル画面が開かれます。
PowerShellの実行はデフォルトでスクリプトが実行不可能な状態になっています。実行可能にするmたにPowerShellの実行ポリシーを変更します。現在の実行ポリシー設定はターミナルに「Get-ExecutionPolicy」と入力し、Enterキーを押せば確認することができます。デフォルトでは、"Restricted"が設定されています。
Get-ExecutionPolicy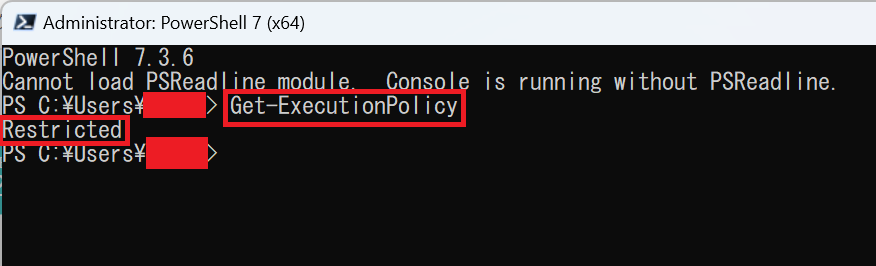
管理者権限でPowerShellを起動すれば、この実行ポリシーを変更することができます。設定でよくある実行ポリシーは、「RemoteSigned」です。この実行ポリシーでPowerShellの実行が可能になります。設定コマンドを以下に紹介します。
Set-ExecutionPolicy RemoteSigned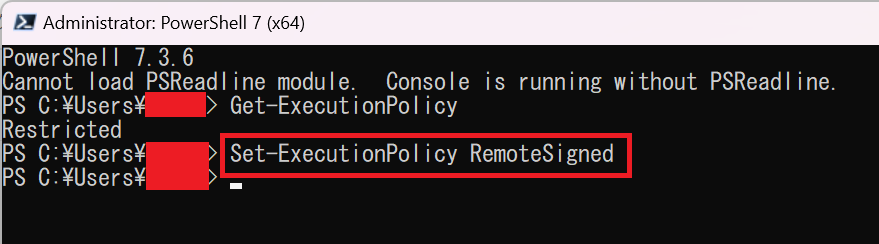
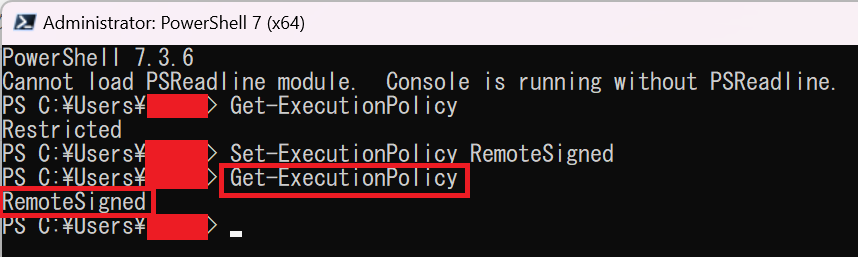
設定がきっちり変更できた事を確認するため、今一度「Get-ExecutionPolicy」コマンドを実行し、変更後の実行ポリシーを確認します。
Example(testing_chromedriver_get.ps1)
簡単にスクリプトの内容を説明すると、コード実行の流れ❹「現バージョンに合致したchromedriverのZIPファイル」の確認方法を指定のJSONファイルから該当するURIを見つけてダウンロード実行しています。
$shell = New-Object -ComObject Shell.Application
$archpath = $downloadFolder + "\chromedriver-testing"
$date = Get-Date -Format "yyyy年MM月dd日"
$output_date = "`r`n$date"
$log_file = $archpath + "\chromedriver_downloadlog.txt"
if (-Not(Test-Path $archpath)) {
    New-Item $archpath -Type Directory
    New-Item $log_file}
$date = Get-Date -Format "yyyy年MM月dd日"
$output_date = "`r`n$date"
echo $output_date >> $log_file

#ChromeDriverのexeファイルディレクトリー設定
$driverpath = $env:LOCALAPPDATA + "\SeleniumBasic\"
if (-Not(Test-Path $driverpath)) {
    $driverpath = $shell.NameSpace("shell:ProgramFiles").Self.Path + "\SeleniumBasic\"
}
$chromedirstr = "Chrome_directory: " + $googlechrm
echo $chromedirstr >> $log_file

#GoogleChromeのexeファイルディレクトリー設定
$googlechrm = $shell.NameSpace("shell:ProgramFiles").Self.Path + "\Google\Chrome\Application\chrome.exe"
if (-Not(Test-Path $googlechrm)) {
    $googlechrm = $shell.NameSpace("shell:ProgramFilesX86").Self.Path + "\Google\Chrome\Application\chrome.exe"
}
$driverdirstr = "ChromeDriver_directory: " + $driverpath
echo $driverdirstr >> $log_file

#GoogleChromeの現バージョン確認
$ChromeVersion = (get-item ($googlechrm)).VersionInfo.FileVersion
$latest = $ChromeVersion.Split(".")
$MjLatest = $latest[0] + '.' + $latest[1] + '.' + $latest[2] + '.'
$ChromeVerionstr = "ChromeVersion: " + $ChromeVersion
echo $ChromeVerionstr >> $log_file

$str = "https://googlechromelabs.github.io/chrome-for-testing/known-good-versions-with-downloads.json"
$response = Invoke-WebRequest -Uri $str -UseBasicParsing
$jsondata = ConvertFrom-Json $response
$latestVersion = $jsondata.versions | Where-Object {$_.version -like "$MjLatest*"}
$targetUrl = $latestVersion[-1].downloads.chromedriver.url[3]  #最新バージョンの取得と、Win32用のZIPファイルを選択

$downloadFolder = $shell.NameSpace("shell:downloads").Self.Path
$savepath = $downloadFolder + "\chromedriver-win32.zip"
Invoke-WebRequest $targetUrl -OutFile $savepath

#ZIPファイル解凍
Expand-Archive -Path $savepath -DestinationPath $archpath -Force

#ファイルコピー
$copypath = $downloadFolder + "\chromedriver-testing\chromedriver-win32\chromedriver.exe"
Copy-Item -Path $copypath -Destination $driverpath -Force
Example(chromedriver_getB.ps1)
正規版のChromeDriverの存在有無を先に確認してからテスト版のChromeDriver取得をしたい方は、以下スクリプトを"testing_chromedriver_get.ps1"と同じディレクトリに保存して、実行してください。
#初回起動時、ログ保存用のファルダ、ファイルを作成
$shell = New-Object -ComObject Shell.Application
$downloadFolder = $shell.NameSpace("shell:downloads").Self.Path
$archpath = $downloadFolder + "\chromedriver_win32"
$log_file = $archpath + "\chromedriver_downloadlog.txt"
if (-Not(Test-Path $archpath)) {
    New-Item $archpath -Type Directory
    New-Item $log_file}
$date = Get-Date -Format "yyyy年MM月dd日"
$output_date = "`r`n$date"

#GoogleChromeのexeファイルディレクトリー設定
$googlechrm = $shell.NameSpace("shell:ProgramFiles").Self.Path + "\Google\Chrome\Application\chrome.exe"
if (-Not(Test-Path $googlechrm)) {
    $googlechrm = $shell.NameSpace("shell:ProgramFilesX86").Self.Path + "\Google\Chrome\Application\chrome.exe"
}
$chromedirstr = "Chrome_directory: " + $googlechrm

#ChromeDriverのexeファイルディレクトリー設定
$driverpath = $env:LOCALAPPDATA + "\SeleniumBasic\"
if (-Not(Test-Path $driverpath)) {
    $driverpath = $shell.NameSpace("shell:ProgramFiles").Self.Path + "\SeleniumBasic\"
}
$driverdirstr = "ChromeDriver_directory: " + $driverpath#echo $driverdirstr >> $log_file

#GoogleChromeの現バージョン確認
$ChromeVersion = (get-item ($googlechrm)).VersionInfo.FileVersion
$latest = $ChromeVersion.Split(".")
$MjLatest = $latest[0]
$ChromeVerionstr = "ChromeVersion: " + $ChromeVersion

#現バージョンに合致したchromedriverのダウンロード
$str = "https://chromedriver.storage.googleapis.com/index.html?path=" + $MjLatest + "*"
$response = Invoke-WebRequest -Uri "https://chromedriver.chromium.org/downloads" -UseBasicParsing
$links = $response.Links | Where-Object {$_.href -like $str} | Select-Object -ExpandProperty href
#該当リンクがなければ終了
if ($links.Count -le 0) {
    $CurrentDir = Split-Path $MyInvocation.MyCommand.path
    . $CurrentDir\testing_chromedriver_get.ps1  #testing_chromedriver_get.ps1の呼び出し
    exit
}else{
    echo $output_date >> $log_file
    echo $chromedirstr >> $log_file
    echo $driverdirstr >> $log_file
    echo $ChromeVerionstr >> $log_file

    $targetUrl = $links[0].Replace("index.html?path=", "") + "chromedriver_win32.zip"
    $outputstr = "DownloadLink: " + $targetUrl
    echo $outputstr >> $log_file

    $savepath = $downloadFolder + "\chromedriver_win32.zip"
    Invoke-WebRequest $targetUrl -OutFile $savepath

    #ZIPファイル解凍
    $archpath = $downloadFolder + "\chromedriver_win32"
    Expand-Archive -Path $savepath -DestinationPath $archpath -Force

    #ファイルコピー
    $copypath = $downloadFolder + "\chromedriver_win32\chromedriver.exe"
    Copy-Item -Path $copypath -Destination $driverpath -Force

}
Chromeブラウザバージョン:114以前の対応
2023年8月現在、Chromeブラウザのバージョンが115以上のPCの場合、こちらのスクリプトではバージョンアップができません。参考までにこれまでにスクリプトは残しておきますので、スクリプト内容を確認したい方は、以下をクリックしてみてください。Chromeブラウザのバージョンが114以下の方はこちらのスクリプトでもChromeDriverを取得できます。
chromedriver_get.ps1(ここをクリック)
$ErrorActionPreference = "Stop"
try {

#初回起動時、ログ保存用のファルダ、ファイルを作成
$shell = New-Object -ComObject Shell.Application
$downloadFolder = $shell.NameSpace("shell:downloads").Self.Path
$archpath = $downloadFolder + "\chromedriver_win32"
$log_file = $archpath + "\chromedriver_downloadlog.txt"
if (-Not(Test-Path $archpath)) {
    New-Item $archpath -Type Directory
    New-Item $log_file}
$date = Get-Date -Format "yyyy/MM/dd HH:mm:ss"
$output_date = "`r`n$date"
echo $output_date >> $log_file

#GoogleChromeのexeファイルディレクトリー設定
$googlechrm = $shell.NameSpace("shell:ProgramFiles").Self.Path + "\Google\Chrome\Application\chrome.exe"
if (-Not(Test-Path $googlechrm)) {
    $googlechrm = $shell.NameSpace("shell:ProgramFilesX86").Self.Path + "\Google\Chrome\Application\chrome.exe"
}
$outputstr = "Chrome_directory: " + $googlechrm
echo $outputstr >> $log_file

#ChromeDriverのexeファイルディレクトリー設定
$driverpath = $env:LOCALAPPDATA + "\SeleniumBasic\"
if (-Not(Test-Path $driverpath)) {
    $driverpath = $shell.NameSpace("shell:ProgramFiles").Self.Path + "\SeleniumBasic\"
}
$outputstr = "ChromeDriver_directory: " + $driverpath
echo $outputstr >> $log_file

#GoogleChromeの現バージョン確認
$ChromeVersion = (get-item ($googlechrm)).VersionInfo.FileVersion
$latest = $ChromeVersion.Split(".")
$MjLatest = $latest[0]
$outputstr = "ChromeVersion: " + $ChromeVersion
echo $outputstr >> $log_file

#現バージョンに合致したchromedriverのダウンロード
$str = "https://chromedriver.storage.googleapis.com/index.html?path=" + $MjLatest + "*"
$response = Invoke-WebRequest -Uri "https://chromedriver.chromium.org/downloads" -UseBasicParsing
$links = $response.Links | Where-Object {$_.href -like $str} | Select-Object -ExpandProperty href
#該当リンクがなければ終了
if ($links.Count -le 0) {
    echo "Not exists DownloadLink" >> $log_file
    exit
}else{
    $targetUrl = $links[0].Replace("index.html?path=", "") + "chromedriver_win32.zip"
    $outputstr = "DownloadLink: " + $targetUrl
    echo $outputstr >> $log_file
}

$savepath = $downloadFolder + "\chromedriver_win32.zip"
Invoke-WebRequest $targetUrl -OutFile $savepath

#ZIPファイル解凍
$archpath = $downloadFolder + "\chromedriver_win32"
Expand-Archive -Path $savepath -DestinationPath $archpath -Force

#ファイルコピー
$copypath = $downloadFolder + "\chromedriver_win32\chromedriver.exe"
Copy-Item -Path $copypath -Destination $driverpath -Force

}
# エラー発生の場合、ログ出力
catch {
    echo $Error[0].Exception.Message >> $log_file
}
finally {
}
タスクスケジューラの設定
上記PowerShellのコードは“C:\TaskScheduler\ChromeDriverUpdate\chromedriver_getB.ps1”で保存します。タスクスケジューラの設定方法は以下のとおりです。
- トリガーの設定
週一回で設定、停止するまでの時間10分 - 操作の設定
プログラム/スクリプト pwsh
引数の追加 -Command “C:\TaskScheduler\ChromeDriverUpdate\chromedriver_getB.ps1”
開始(オプション) C:\TaskScheduler\ChromeDriverUpdate
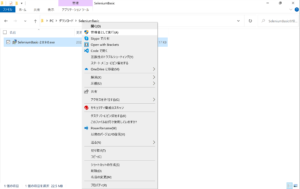
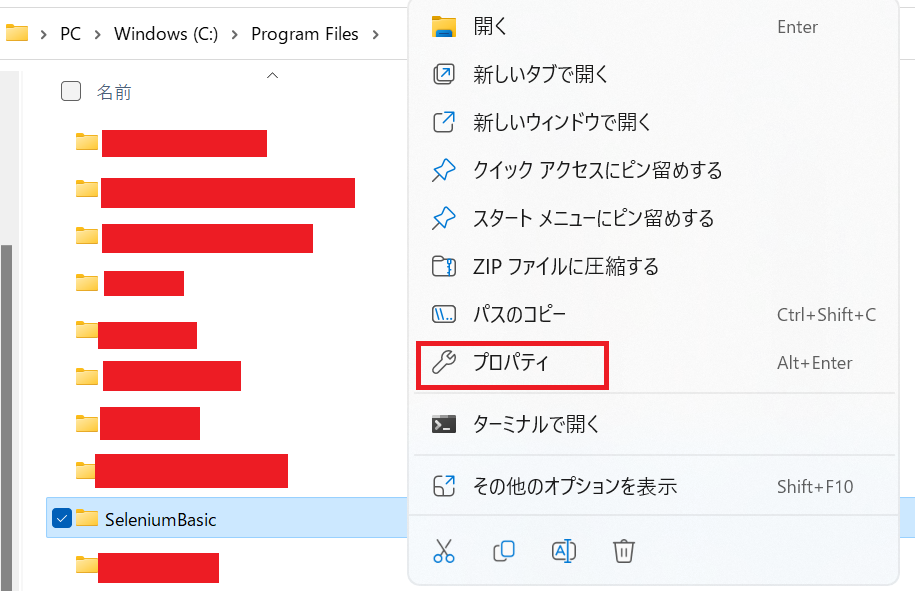
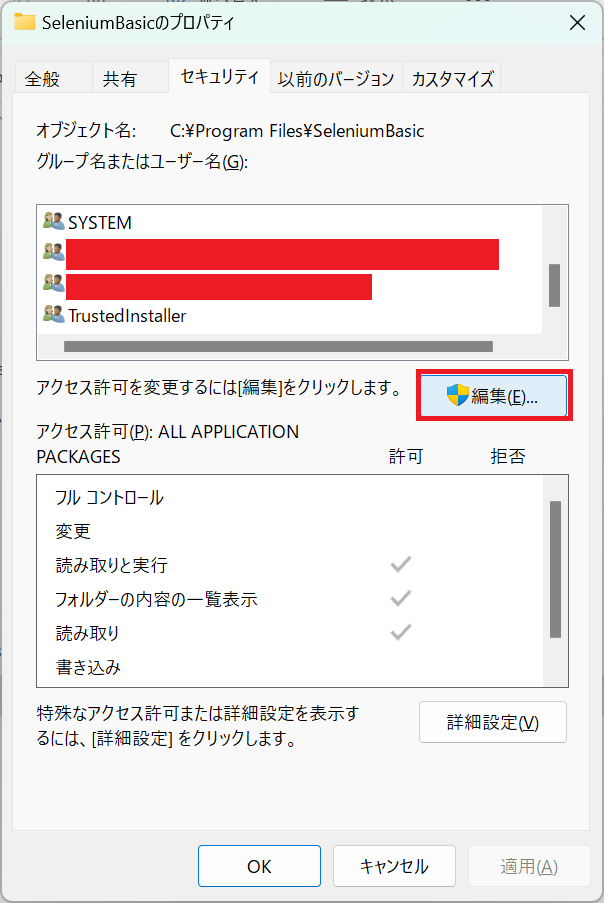
"C:\Program Files"の中をファイル操作する場合は、フォルダ権限を変更しなければ操作不能になる可能性があります。権限付与をする手順を以下に紹介します。
フォルダ権限付与の手順(ここをクリック)
Program Filesフォルダを右クリックして、プロパティを開きます。
「編集」ボタンをクリック
追加ボタンをクリック
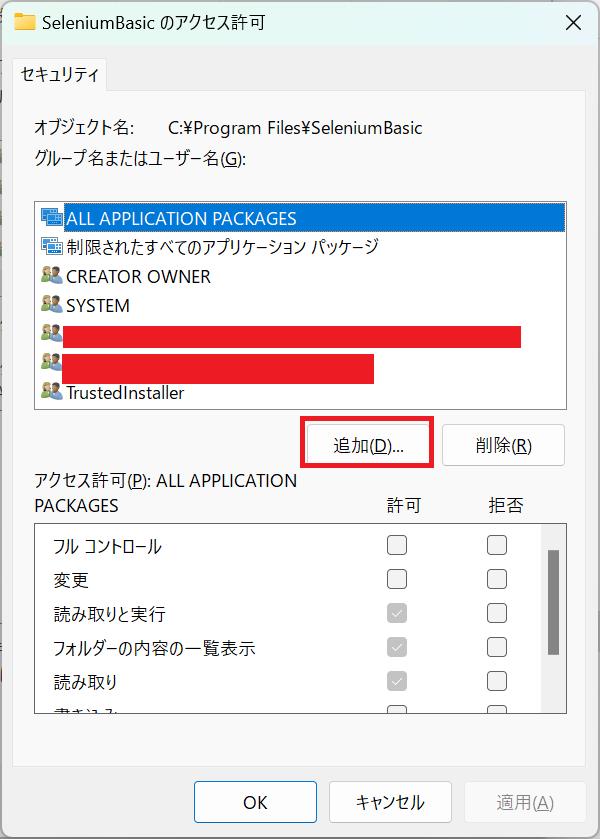
「詳細設定」ボタンをクリック
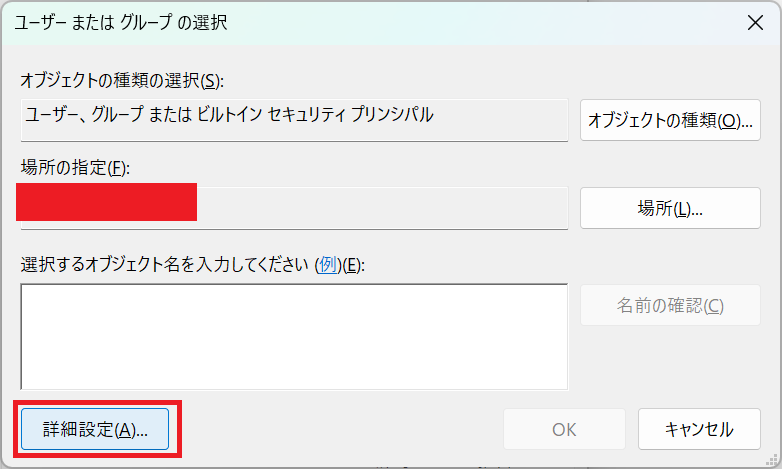
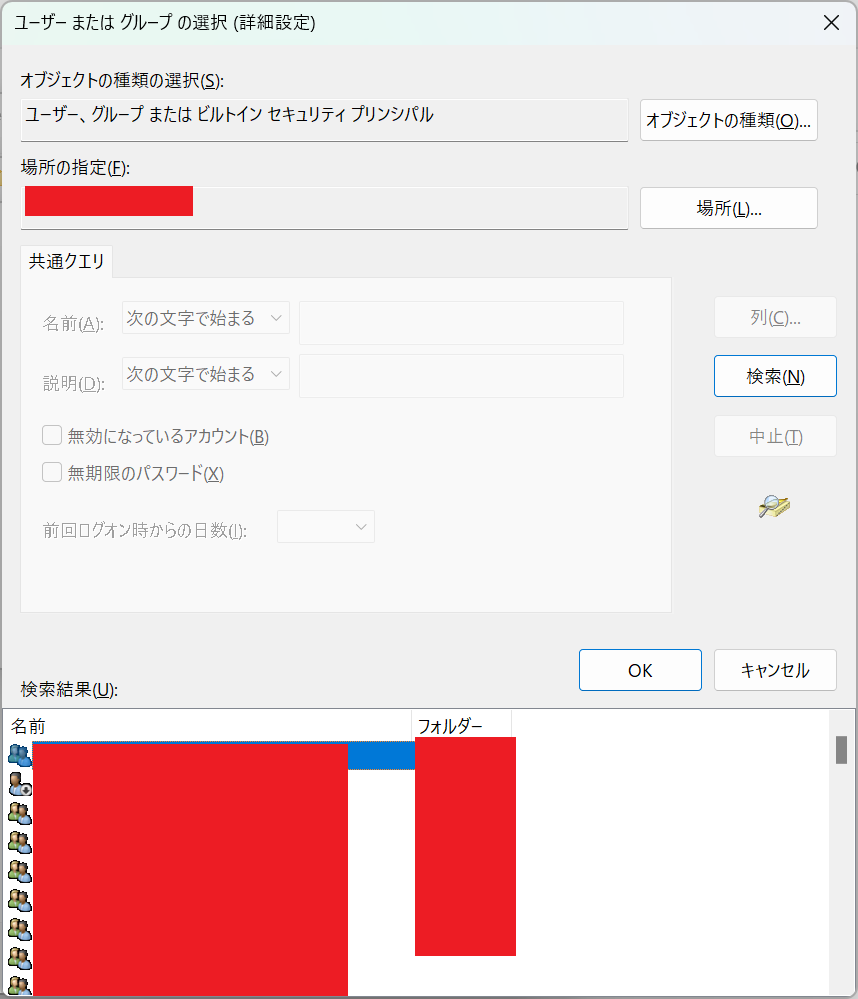
「検索ボタン」をクリック
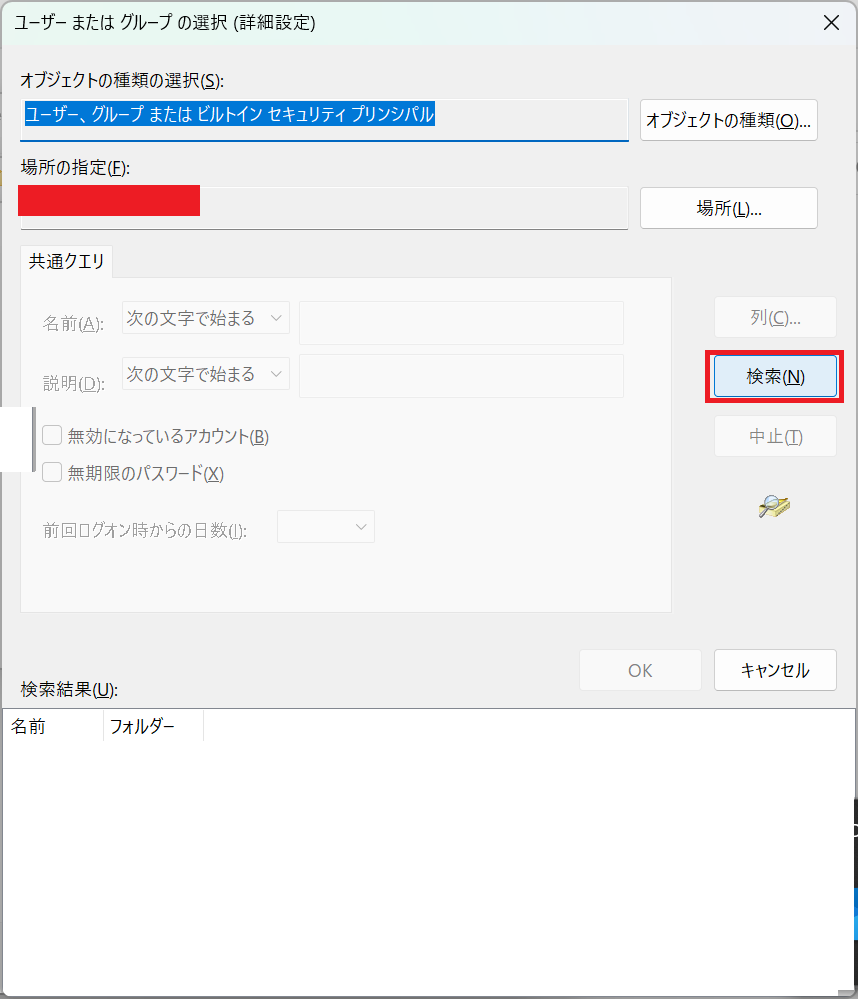
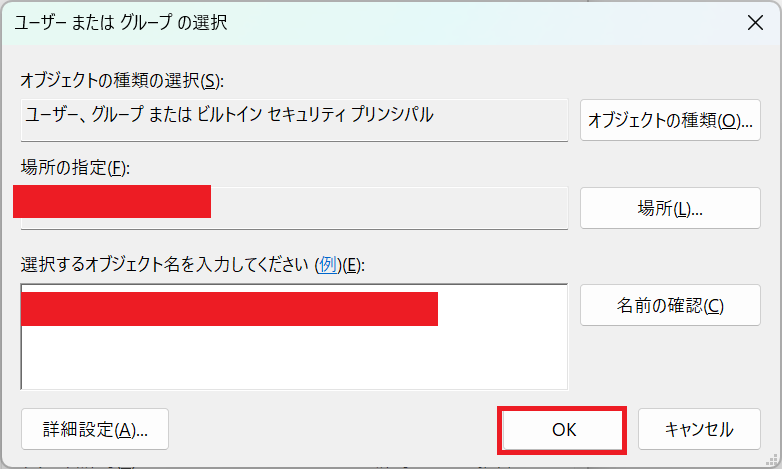
ログオン中のユーザを選択し、ダブルクリックか、「OK」ボタンをクリック
「OK」ボタンをクリック
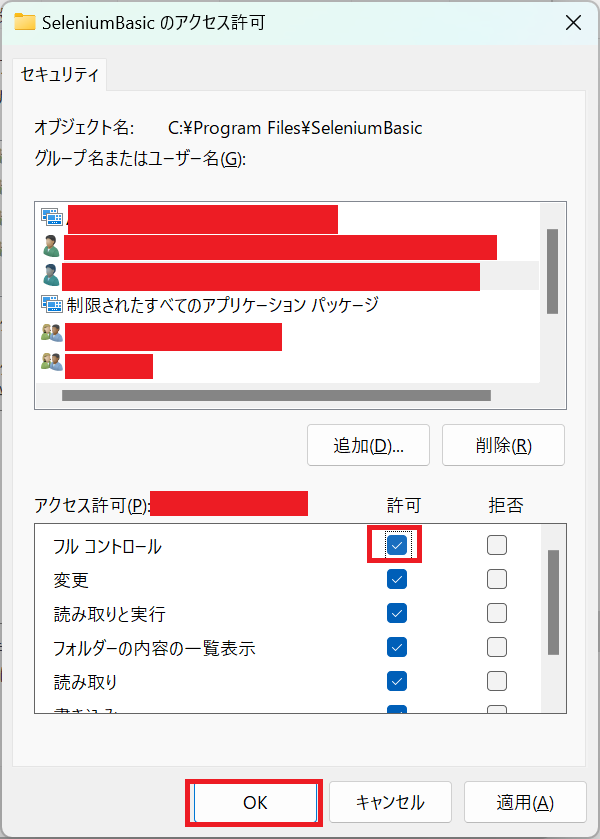
選択したユーザ名を選択し、フルコントロールの許可を付与します。付与後、「OK」ボタンをクリック。
また、タスクスケジューラをログオフ状態でも起動できる様に設定しておけば、バックグラウンドで自動的にChromeドライバーがされます。設定方法については以下ページを参照ください。
タスクスケジューラによる定期更新(VBA)
タスクスケジューラによりPowerShell経由でVBAを動かし、Chromeドライバーを定期更新することができます。以下手順です。
- VBAでChromeドライバーをダウンロードするコードを作成
- ExcelVBA実行用のPowershellファイルを作成
- タスクスケジューラでPowerShell実行のスケジュールを組む
VBAでChromeドライバーをダウンロードするコードを作成
Chromeドライバーの自動更新用のコードは、damのプログラミングさんのページで掲載されている方法を利用させていただいております。解説も詳しくされていますので、この手法を利用する場合は一度ページを参照される事をお勧めします。以下、ページをご案内します。
メインコード名は、"Sub getdriver()"とし、フルファイル名は、"C:\TaskScheduler\ChromeDriver更新\GetChromedriver.xlsm"で保存します。
PC環境によって少しアレンジを加える必要がある場合があります。ページ主さんのコードをそのままここのページに載せる訳にはいきませんので、以下注意点に沿ってコードを加筆修正いただければと思います。
windowsAPI利用をVBEエディター宣言文で入力するのですが、使用するOfficeのbitバージョンが32bitか64bitで宣言文が変わってきます。どちらのバージョンでも対応できる様な宣言文は以下の様になります。
#If Win64 Then
    Private Declare PtrSafe Function URLDownloadToFile _
        Lib "urlmon" Alias "URLDownloadToFileA" _
        (ByVal pCaller As Long, _
        ByVal szURL As String, _
        ByVal szFileName As String, _
        ByVal dwReserved As Long, _
        ByVal lpfnCB As Long) As Long
#Else
    Private Declare Function URLDownloadToFile _
        Lib "urlmon" Alias "URLDownloadToFileA" _
        (ByVal pCaller As Long, _
        ByVal szURL As String, _
        ByVal szFileName As String, _
        ByVal dwReserved As Long, _
        ByVal lpfnCB As Long) As Long
#End IfChrome実行ファイルはPC環境によって、C:\Program Files (x86)に保存されている場合とC:\Program Filesに保存されている場合があります。FSOにてフォルダ存在確認をしてどちらのフォルダに実行ファイルが保存されているか確認するコードを入れると良いかと思います。コードの挿入箇所は、"Function getChromVersion(errStr)"内になります。
Dim ChromeExe As String: ChromeExe = "C:\Program Files\Google\Chrome\Application"
If Not FSO.FolderExists(ChromeExe) Then
    ChromeExe = "C:\Program Files (x86)\Google\Chrome\Application"
End IfChromeドライバーはPC環境によって、"shell:Local AppData\SeleniumBasic"に保存されている場合と"C:\Program Files\Seleniumbasic"に保存されている場合があります。コードの挿入箇所は、"Function autoDownloadChromedriver(errStr)"内になります。
Dim FSO As Object: Set FSO = CreateObject("Scripting.FileSystemObject")
dest = Environ("LOCALAPPDATA") & "\SeleniumBasic\"
If Not FSO.FolderExists(dest) Then dest = "C:\Program Files\SeleniumBasic\"
ExcelVBA実行用のPowershellファイルを作成
PowershellでExcelマクロを実行できる様にファイル作成します。コード例は以下のとおりです。フルファイル名は「C:\TaskScheduler\ChromeDriverUpdate\hoge.ps1」にします。
$filename = "C:\TaskScheduler\ChromeDriverUpdate\GetChromedriver.xlsm"
$xlfile = $filename
$xl = New-Object -Com Excel.Application
$wb = $xl.Workbooks.Open($xlfile)
$xl.Visible = $true
$xl.Run("getdriver")
$xl.DisplayAlerts = $false
$wb.Close()
$xl.DisplayAlerts = $true
#Excelアプリケーションを終了
$xl.Quit()
#COMオブジェクトの参照を解放
[void][System.Runtime.InteropServices.Marshal]::FinalReleaseComObject($xl)
タスクスケジューラでPowerShell実行のスケジュールを組む
タスクスケジューラにて作成したPowershellファイルを実行します。タスクスケジューラの設定手順は、以下「Powershellによるファイル削除設定」ページを参照して設定します。
簡単に、設定内容概要を説明します。
- トリガーの設定
週一回で設定、停止するまでの時間10分 - 操作の設定
プログラム/スクリプト pwsh
引数の追加 -Command “C:\TaskScheduler\ChromeDriverUpdate\hoge.ps1”
開始(オプション) C:\TaskScheduler\ChromeDriverUpdate
"C:\Program Files"の中をファイル操作する場合は、フォルダ権限を変更しなければ操作不能になる可能性があります。権限付与をする手順を以下に紹介します。
フォルダ権限付与の手順(ここをクリック)
Program Filesフォルダを右クリックして、プロパティを開きます。
「編集」ボタンをクリック
追加ボタンをクリック
「詳細設定」ボタンをクリック
「検索ボタン」をクリック
ログオン中のユーザを選択し、ダブルクリックか、「OK」ボタンをクリック
「OK」ボタンをクリック
選択したユーザ名を選択し、フルコントロールの許可を付与します。付与後、「OK」ボタンをクリック。
SeleniumBasic起動毎にドライバー更新
yamato1413さんの記事でVBAを起動時に自動的に更新確認し、必要があれば更新実行してくれるコードが紹介されています。


GitHubのページからZIPファイルをダウンロードし、解凍したファイルを開くと、"WebDriverManager4SeleniumBasic.bas"ファイルがありますので、こちらのモジュールをVBE画面でインポートすれば利用できる様になります。SafeOpen関数でDriverとChromeを引数で指定すれば、SeleniumBasic起動の度にドライバーのバージョンを確認するコードが起動します。利用方法の解説も詳しくされていますので、上記リンクから確認いただければと思います。